
Trigger Docker builds with an AWS IoT Button
Not long ago GitHub and AWS together cross promoted a blog post about triggering new releases in GitHub by pressing an AWS IoT button. This new process got me thinking about how we can use an AWS IoT button together with Docker. After some research and jotting down my thoughts I had the ah-ha moment. What transpired after is a new way to think about how we can use IoT. We can turn the traditional IoT pipeline around and use a device itself to trigger our DevOps pipeline.

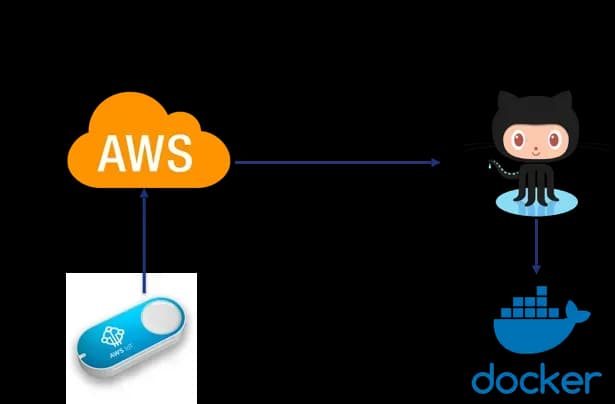
The premise of this project is simple. Press the AWS IoT button with a result of building a Docker image automatically. We can use an AWS IoT button to launch a Lambda Serverless function in AWS, which then creates a new release and tag in GitHub. This newly generated tag then fires a webhook to Docker Hub to start a new Docker build. How do we connect the different services and automate this workflow? Ah ha! That is what we want to find out.
Table of Contents
-
Configure AWS button
-
Setup a GitHub Repository
-
AWS & Lambda Configuration
-
Add certificates to the AWS IoT button
-
Configure Docker Hub
-
Test
-
Recap
1. AWS IoT Button
Before I get carried away, we should cover some of the basics. What is an AWS IoT button? I’m glad you asked. The AWS IoT button started its life as an Amazon Dash button. OK, another button? Yeah, the Amazon Dash button is a button that links a product from the Amazon store like shampoo or washing machine soap to the button. When an end user pressed the button, it would automatically order and ship the product from Amazon. Clever, right?
The development community liked this button so much that they asked AWS if we can have a generic button which so we can develop our use cases. The AWS IoT button was born. The button is said to have 2,000 button presses before the battery dies and I don’t see an easy way to replace the battery, so it’s sure to be interesting when that happens.
Configuring the AWS IoT button is straightforward.
-
Download the AWS IoT mobile app
-
Pair your mobile device with the button and configure the WiFi settings
-
Access the button from the WiFi network and modify additional settings
2. Setup a GitHub Repository
We need to set up a GitHub repo to connect to the AWS Serverless Lambda function. The information in the repo is for the configure AWS & Lambda steps of the installation.
3. AWS & Lambda Configuration
As a starting point, Anisha Gupta did an amazing job building the Lambda which we use for this project. We reused the code made some small changes and then deployed Lambda.
Follow the very well documented README as a first step. I noticed some missing content in the GitHub blog entry but for the life of me couldn’t figure out how to submit a PR to fix it. So when creating the function make sure to ‘Generate Certificate & Key’ in the Trigger section. Save this, and we use it in the next step — https://blog.github.com/2018-08-16-how-to-deploy-to-production-with-an-actual-button

4. Add the Certificate & Keys to the AWS IoT Button
-
Install the Certificates & Key from the previous step on the AWS IoT button.
-
In a browser, navigate to http://192.168.0.1/index.html which opens a configuration interface on the button

-
Inside the configuration interface upload your Certificate & Private Key
-
Click configure to update the button
5. Configure Docker Hub Automated Builds
With the power of the internet and webhooks, we link Docker Hub to GitHub. Docker Hub now is configured to watch our GitHub Repo for any changes. We configure Docker Hub specifically to look for any new GitHub tags. A new tag is created every time we press the AWS IoT button (Crazy, right?).
We configure the build settings to create 2x Docker builds. The first Docker builds the newly created version/tag available in GitHub and the second build is the latest tag.
-
Login to Docker Hub
-
Create an Automated Build by clicking Create -> Automated Build

-
Link the build to your GitHub account to the repo which we forked earlier.
www.github.com/<your GitHub username>/awsiot-github-docker-build -
Navigate to the
Build Settingsinside the newly created Docker Hub repo. -
Change the
typetotag -
Change the
nameto/^[0-9.]+$/ -
Change the
Docker Tag Nametolatest

-
Click the green plus sign to add another build setting.
-
Configure it the same as step 5 & 6 but leave the
Docker Tag Nameblank -
Save your changes
6. Time to Test our IoT Button Pipeline
Our DevOps pipeline is now configured and ready for some action. Before we get started, we need to make a change to our repo, so we have a difference in code base between version 1.0 and 2.0. It’s easier than it sounds, no worries. Test version 1.0 locally to see what displays. Next, update the, Dockerfile commit our code to GitHub, and finally press the AWS IoT button to trigger the Docker build.
- We combined the all the commands needed to create your new
Dockerfileand push it to GitHub. Copy the below command snippet and paste into your command prompt which will execute all the commands. Be sure to change your GitHub username in the GitHub URL!
git clone https://github.com/<Your GitHub User>/awsiot-github-docker-build.git cd awsiot-github-docker-build cat << EOF | Dockerfile FROM nginx:latest COPY index-new.html /usr/share/nginx/html/index.html COPY 56kcloud_logo.png /usr/share/nginx/html EXPOSE 80 443 CMD ["nginx", "-g", "daemon off;"] EOF git add Dockerfile git commit -m "My Release will be called X" git push
The Repo is now available with a different Dockerfile. Let’s now trigger the pipeline to create a new release based on this.
-
Press your AWS IoT Button to start the Pipeline
-
Open your GitHub repo and open the releases tab This is the demo repo but you should navigate your repo, and we should now see a new version just created.

- Monitor GitHub until the new release appears then navigate back to Docker Hub and click the build details tab. We should now see two builds running latest and a new version. Amazing!

- When the build completes, we can run our new version. Go ahead and run it
docker run -d -p 8080:80 --name prod-app <Your Docker Hub ID>/awsiot-github-docker-build:<version number from step 3 or latest>
Wow, we just turned an IoT button into a DevOps pipeline trigger. Just one of the many use cases. Imagine your next software release triggered by the press of a button. The use cases for the AWS IoT button or IoT, in general, continues to grow. Hardware continues to look more like software and adapt to web standards the entry point for new developers continues getting easier.
Rest assured that this is not the last time you hear from our AWS IoT button. More projects in the “Pipeline” so to say.
Find out more about 56k.Cloud
We love Cloud, Containers, DevOps, and Infrastructure as Code. If you are interested in chatting connect with us on Twitter or drop us an email: info@56k.cloud or reach out below here on Medium! We hope you found this guide helpful. If there is anything you would like to contribute and/or have questions; please let us know!
Get in touch
Tell us about your project and we'll get back to you within 24 hours.
- Tell us about your challenge
- Get a tailored architecture proposal
- Start building with expert support